Open a new project → enter to Editor

Setting existing project
Copy
Delete
Upload
Change name
Change display image
Cancel

Left
❶ Selection tool
• Palm: canvas
• Cursor: Layer
❷ Import Materials
• Album
• Cloud
• Official doodles
❸ Toolbar
• Typing
• Geometry
• Vector hand drawn
• Grayscale hand drawn

Upper
❶ Camera Preview
❷ Trashcan
❸ Archive
❹ Step
• Previous
• Next
❺ Canvas zoom
• Focus
• Full Size
• 1:1
❻ Background
• Grid switch
• Preview switch
❼ Duplicate layer

❶ Vector
❷ Grayscale
 Vector
• Layer Name
• Position
X / Y
In mm
• Size
Height / Width
In mm
• Rotate
• Flip

Grayscale
• Adjust Lightness
Contrast
• Convert
Preview path
Original image
Reverse Fill
• Halftone

Drag up to the vector layer
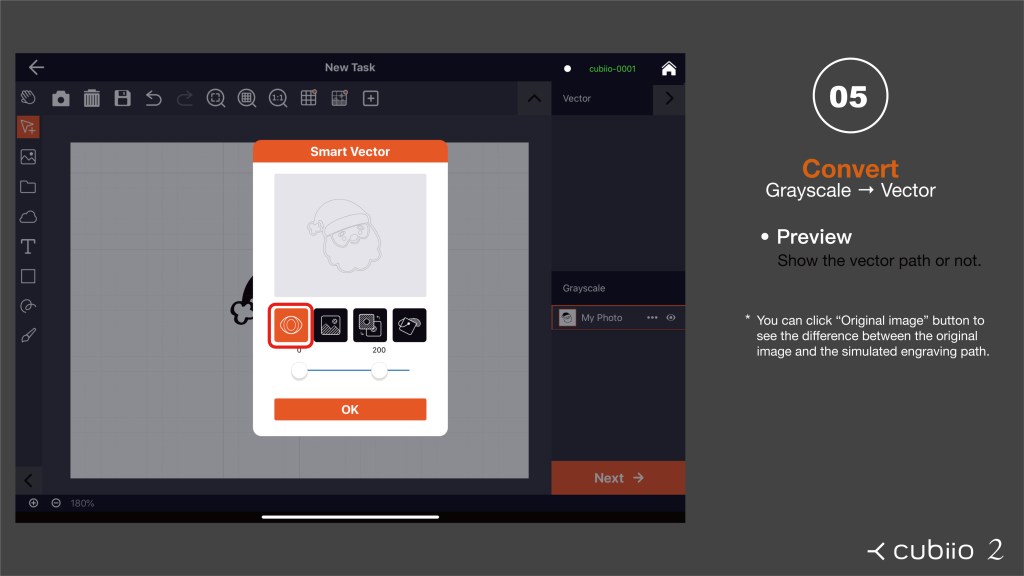
Preview-Show the vector path or not
* You can click “Original image” button to see the difference between the original image and the simulated engraving path.

Original image
Show the original image or not.

Reverse
Black and white switch
* You can use the reverse switch to invert the black/white region.
* This feature is useful for making stamp.

Fill
Select the fill density (1px = 1 pixel).

Parameter category
Thickness (mm), Power(%), Speed(mm/s), Repeats
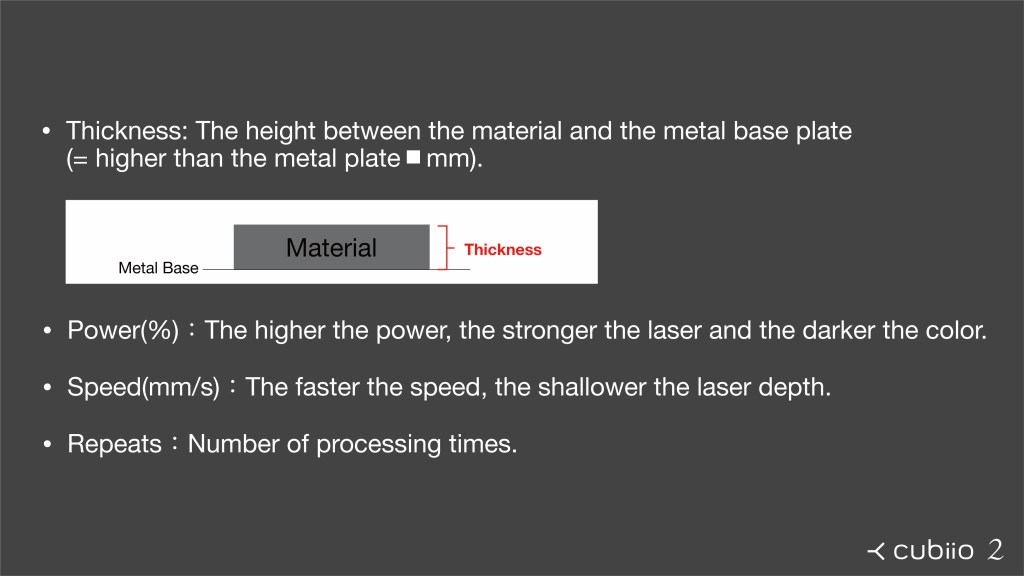
Thickness: The height between the material and the metal base plate (= higher than the metal plate■mm).
Power(%): The higher the power, the stronger the laser and the darker the color.
Speed(mm/s): The faster the speed, the shallower the laser depth.
Repeats: Number of processing times.

Built-in parameters
Choose Materials:Import parameters, can be fine-tuned.

Save custom parameters
Select ”Add”, enter:Material, Power, Speed, Repeats

Set each layer
Different layers can be set with different parameters. Cut/Carved, Deep/Light all can be done in one task!

Lasering
• Pause
• StopThe
lasering process will show the time/progress

Finish
• Repeat
• Back to homepage


Press〈More info〉→〈Run anyway〉
*Other anti-virus software may also prevent the software from opening, please click to run anyway

1. Speed (1%~100%)
2. Power (1%~100%)
3. The height of the processing position, with the upper surface of the base plate as the origin, upwards is positive and downwards is negative (+10 mm ~ -3 mm)
4. How many times the process should be repeat
5. When the process is repeated, the focal length of the laser moves downward each time.
6. Processing position setting, the x and y coordinates of the file center position.
7. File rotation (positive for counterclockwise)
8. Scale up/down
9. Rotation axis position
10. Complete parameter setting


Press from tool bar 〈Machine〉→〈Advance〉→ 〈Update Firmware〉


1. Display the current machine firmware version, and check the latest firmware version
2. Download the latest firmware
※ Note: To check the latest firmware and download the latest firmware, you must connect your computer to an external network
3. Drag the downloaded firmware (.bin) file to this area to start the firmware update
4. When the orange progress bar runs to the end, the machine will start to update the firmware and the indicator light will be red

5. The successful firmware upload window pops up. After the firmware update is completed, the machine will automatically return to the original point, and the indicator light will be a green breathing light.
Press from tool bar〈Machine〉→ 〈Advance〉→〈Calibration〉


- Use yellow paper for calibration and make sure the paper close up tightly with left edge and down edge.
- Calibration engraving The laser will engrave an Lshaped right angle in the down left corner.
- Measure with a ruler The horizontal distance from the engraving line to the edge of the paper is “cali-x” The vertical distance from the engraving line to the edge of the paper is “cali-y”

Step 2.
Press “Run Calibration” button
(Fixed parameters: speed 30%, power 60%, height 0)
Step 3.
Measure the distance between the engraved line and the paper boundary. Key in the “cali-x” and “cali-y” and press the 〈Set offset〉 button
Step 3-1.
After setting, the calibration value you entered will pop up.
Step 4.
Confirm the origin position: The laser head will move to the left-down corner and turn on the low-power laser. Confirm that the laser spot is located at the border junction of the corner. If there is still a visible gap between the light spot and the border of the metal base plate, repeat steps 1 to 3.
Step 5.
Calibration is complete, press Ctrl + Shift + H to “Go Home” program.
https://cubiio.com/support/download
All about Cubiio 2 can be found here ^^

Only 4-DIGIT in the red box as shown below. The sticker at the back panel.
Use a pin to poke the “recessed button” next to the WPS button for 3~5 seconds, and then the indicator flashes 3 times quickly. That means a successful reset.
Please close the acrylic lid firmly and then “Go Home” before executing any tasks.
The acrylic lid might not be closed successfully without leveling, as described on manual page 11, Step 4. In addition, please update your App.
The new App will show an exact message about the unclosed lid.
No, please use a g-code file (vector nature) to perform cutting.
Here is an example g-code file.
The working parameters are Power 90% Speed 10%, as listed in the file name. Please note that Cubiio 2 only accepts g-code filename as *.txt, NOT *.gcode!
Two steps:
1. Save the g-code *.txt file in your iCloud drive.
2. Click the Folder Icon (just above the Cloud Icon) and then you can load any file in your iCloud drive.

Use screws to start: T10H (the first row on the right) remove the eight screws of the base plate.


Use a screwdriver: H2.5 (second row, fourth from right) to remove the screws on the upper right corner of the cassette.